[How To] use Test-Connection
Have you ever used the legacy Ping command prompt command? If yes, you are in the right place. The Ping command was build for legacy Command Prompt and was used for decades now. If you don’t know what i am talking about, then let me give you brief about ping command
If you have multiple systems in your environment and you want to know which one is Switched ON and which are Switched Off, then the common test we do is to test the connection over the network using the Ping. Even if you wanted to check the internet connectivity on your local system, you could use the ping command to test network connection between public servers in the cloud(Example. Google.com, Yahoo.com)
Let’s not spend much time on Ping. Below is the screenshot of the ping command for testing connection to Google server from the local machine.
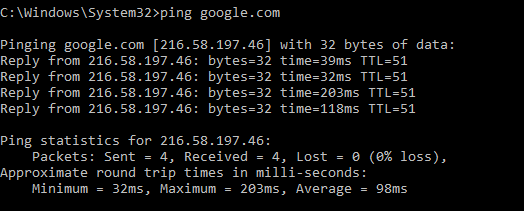
Yes, I know that it is giving a lot of information which can be useful in troubleshooting network connectivity. But, Think once. Do you need all those information Always?
The simple answer would be NO. Because you just want to check the connectivity most of the time and you don’t need all the information given in that. Let me tell you one more thing to switch to new and secured way of testing network connectivity. Ping requires ICMP port 7 to be opened to respond to the incoming requests.
In the current generation, where network security is becoming the big concern for all the IT administrators, they would always try to block the ports for incoming request wherever possible. So, Many organization will have ICMP port 7 blocked from the firewall. Hence, the result you get from Ping command may not be right always.
So, What is next? If not Ping, what to use?
A simple answer for all these questions is to use PowerShell Cmdlet Test-Connection
When it comes to PowerShell, it uses WinRM to execute the cmdlets which are safe to run on any environments as the communications are encrypted by default. So, Let’s take a look at how Test-Connection defers from Ping in visual.
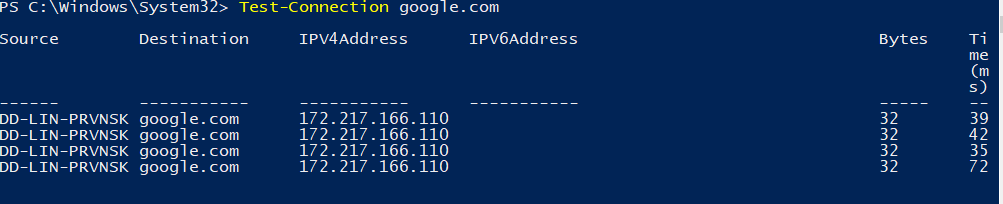
I know, you may be thinking that even this is giving a lot of information which you may not need always. I agree. but lets simplify it using PowerShell.
Just follow the method i am using below and see how this could be simplified and customized as per your needs.
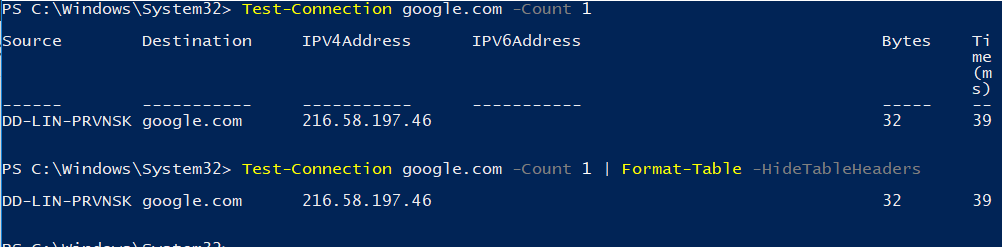
Test-Connection Google.com -Count 1
Test-Connection Google.com -Count 1 | Format-Table -HideTableHeaders
Still, have questions in the head, See the below output.
Test-Connection Google.com -Count 1 -Quiet

You just get the output as True. Meaning that the server is reachable. If the server is not reachable, then you would get the result as False.
In the above, I have shown you how we used to work in legacy Ping command and how to use the PowerShell Test-Connection Cmdlet from getting all the details to the stripped down the result of just True or
So far, we are good at simplifying the process. Let’s leverage this and test connections for multiple servers.
Test-Connection Google.com,10.10.10.10 -Count 1 -Quiet

In the Above Cmdlet, I have used the same Google.com which is reachable and 10.10.10.10 IP address which does not exist to show you the output for both Reachable & non-reachable servers and to tell you that it accepts the strings and integers both(Name and IP Address of the servers)
Let’s write a script that takes input from a file which contains the list of computer name or IP Addresses and test connection to each of them and save the output to another file.
 Param(
$ComputerName = (Get-Content "Enter The File Path")
)
Foreach ($computers in $ComputerName) {
    $host.ui.RawUI.WindowTitle = "Testing Connection on $($computers.ToUpper())"
    Test-Connection -Count 2 -WarningAction SilentlyContinue |
    Select-Object ComputerName, @{Name = 'Pingable'; Expression = 'PingSucceeded'} |
    Export-Csv $env:USERPROFILE\Desktop\PingResults.csv
}
The Above Script takes a text file as input and tests connection for each computers which are added in the file separated by lines and outputs the results to your desktop with the file name PingResults.csv.


This site is my inspiration , rattling superb pattern and perfect content.